This
is my experiment using GNS3 to make a Routing Information Protocol (RIP) simulation. GNS3 is an open source (GNU GPL) software that
simulate complex networks while being as close as possible from the way real
networks perform, all of this without having dedicated network hardware such as
routers and switches (Wikipedia).
I
assume you know much about the theory RIP and you have successfully installed
GNS3. So in this post we will not discuss the theory RIP. Ok, let's try to make it.
R-
JKT
|
R-CORE
|
R-MTR
|
|
Fa
0/0
|
10.10.1.1/24
|
192.168.1.2/30
|
10.10.3.1/24
|
Fa
0/1
|
10.10.2.1/24
|
192.168.2.2/30
|
10.10.4.1/24
|
Comp
1
|
10.10.1.2/24
|
10.10.3.2/24
|
|
Comp
1
|
10.10.2.2/24
|
10.10.4.2/24
|
|
Fa
1/0
|
192.168.1.1/30
|
192.168.2.1/30
|
|
Loopback0
|
10.1.1.1/24
|
10.2.2.2/24
|
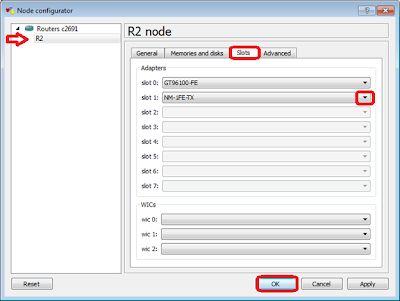
Look at the image above. There are 3 routers. All routers use router C2691 version. Because routers R2 and R3 must have 3 interfaces, so add 1 interface again.
Right
click on router R2, then select configure. In the tab slots, select NM-1FE-TX
at slot 1. Then click ok. Look at image below.
Use
the same way, for router R3.
Ok.
Furthermore configure all routers.
Configuration interface and
hostname Router R-JKT
R2#config ter
R2(config)# hostname R-JKT
R-JKT(config)#inter fa0/0
R-JKT(config-if)#inter fa0/0
R-JKT(config-if)#ip address
10.10.1.1 255.255.255.0
R-JKT(config-if)#desc GATEWAY LAN 1
JKT
R-JKT(config-if)#no shut
R-JKT(config-if)#inter fa0/1
R-JKT(config-if)#ip address
10.10.2.1 255.255.255.0
R-JKT(config-if)#desc GATEWAY LAN 2
JKT
R-JKT(config-if)#no shut
R-JKT(config-if)#inter fa1/0
R-JKT(config-if)#ip address
192.168.1.1 255.255.255.252
R-JKT(config-if)#des WAN R-JKT TO
R-CORE
R-JKT(config-if)#full-duplex
R-JKT(config-if)#speed 100
R-JKT(config-if)#no shut
R-JKT(config-if)#inter loopback 0
R-JKT(config-if)#ip address
10.1.1.1 255.255.255.0
R-JKT(config-if)#do wr
Building configuration...
[OK]
Configuration interface and
hostname Router R-CORE
R4#config ter
R4(config)#host R-CORE
R-CORE(config)#inter fa0/0
R-CORE(config-if)#ip address 192.168.1.2
255.255.255.252
R-CORE(config-if)#des WAN R-CORE TO
R-JKT
R-CORE(config-if)#full-duplex
R-CORE(config-if)#speed 100
R-CORE(config-if)#no shut
R-CORE(config-if)#inter fa0/1
R-CORE(config-if)#ip address
192.168.2.2 255.255.255.252
R-CORE(config-if)#des WAN R-CORE TO
R-MTR
R-CORE(config-if)#full-duplex
R-CORE(config-if)#speed 100
R-CORE(config-if)#no shut
R-CORE(config-if)#do wr
Building configuration...
[OK]
Configuration interface and
hostname Router R-MTR
R3#config ter
R3(config)#hostname R-MTR
R-MTR(config)#inter fa1/0
R-MTR(config-if)#ip address
192.168.2.1 255.255.255.252
R-MTR(config-if)#des WAN R-MTR TO
R-CORE
R-MTR(config-if)#no shut
R-MTR(config-if)#full-duplex
R-MTR(config-if)#speed 100
R-MTR(config-if)#inter fa0/0
R-MTR(config-if)#ip address
10.10.3.1 255.255.255.0
R-MTR(config-if)#des GATEWAY LAN 1
MTR
R-MTR(config-if)#no shut
R-MTR(config-if)#inter fa0/1
R-MTR(config-if)#ip address
10.10.4.1 255.255.255.0
R-MTR(config-if)#des GATEWAY LAN 2
MTR
R-MTR(config-if)#no shut
R-MTR(config-if)#inter loopback 0
R-MTR(config-if)#ip address
10.2.2.2 255.255.255.0
R-MTR(config-if)#do wr
Building configuration...
[OK]
Note :
I found error messages like this.
*Mar
1 00:24:38.047: %CDP-4-DUPLEX_MISMATCH: duplex mismatch discovered on
FastEthernet0/1 (not full duplex), with R-MTR FastEthernet1/0 (full duplex).
So, I set interface full-duplex and speed 100. The
both setting (full duplex and speed 100) can stop the error messages above.
RIP dynamic routing configuration
on the R-JKT
R-JKT(config)#router rip
R-JKT(config-router)#version 2
R-JKT(config-router)#redistribute
connected
R-JKT(config-router)#network
192.168.1.0
R-JKT(config-router)#no
auto-summary
RIP dynamic routing configuration
on the R-CORE
R-CORE#config ter
R-CORE(config)#router rip
R-CORE(config-router)#version 2
R-CORE(config-router)#network
192.168.2.0
R-CORE(config-router)#network
192.168.1.0
R-CORE(config-router)#no
auto-summary
RIP dynamic routing configuration
on the R-MTR
R-MTR(config)#router rip
R-MTR(config-router)#version 2
R-MTR(config-router)#network
192.168.2.0
R-MTR(config-router)#redistribute
connected
R-MTR(config-router)#no
auto-summary
And
this is the result when executing the command “show ip route” (for example in
router R4 / R-CORE)
R-CORE#sh ip route
Codes: C - connected, S - static, R
- RIP, M - mobile, B - BGP
D - EIGRP, EX - EIGRP external, O -
OSPF, IA - OSPF inter area
N1 - OSPF NSSA external type 1,
N2 - OSPF NSSA external type 2
E1 - OSPF external type 1, E2 - OSPF
external type 2
i - IS-IS, su - IS-IS summary, L1 -
IS-IS level-1, L2 - IS-IS level-2
ia - IS-IS inter area, * - candidate
default, U - per-user static route
o - ODR, P - periodic downloaded static
route
Gateway of last resort is not set
10.0.0.0/24 is subnetted, 6 subnets
R 10.10.1.0 [120/1] via 192.168.1.1,
00:00:10, FastEthernet0/0
R 10.10.2.0 [120/1] via 192.168.1.1,
00:00:10, FastEthernet0/0
R 10.10.3.0 [120/1] via 192.168.2.1,
00:00:15, FastEthernet0/1
R 10.10.4.0 [120/1] via 192.168.2.1,
00:00:15, FastEthernet0/1
R 10.2.2.0 [120/1] via 192.168.2.1,
00:00:15, FastEthernet0/1
R 10.1.1.0 [120/1] via 192.168.1.1,
00:00:10, FastEthernet0/0
192.168.1.0/30 is subnetted, 1 subnets
C 192.168.1.0 is directly connected,
FastEthernet0/0
192.168.2.0/30 is subnetted, 1 subnets
C 192.168.2.0 is directly connected,
FastEthernet0/1
Note :
- “no auto-summary”, list routing table will be made in detail, not general. So, If using auto-summary, router can not send packet to destination correctly, because the router R-JKT, and R-MTR, has a network ID that is still in one segment (class A). See the difference between "auto-summary" with "no auto-summary" using the command "sh ip route".
- "redistribute connected", this command is added because there are multiple IP addresses that are connected directly to the router, which does not use RIP routing. For example, the IP address of the user / computer that is directly connected to the router. The computer can not make a setting for dynamic routing.
Configure each computer, using
VPCS.
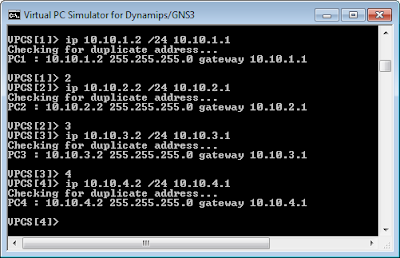
Virtual PC Simulator (VPCS) is a simulator to emulate computer. You can find VPCS in GNS3, click Tools Menu - VPCS. Then
the configuration settings like below.
VPCS[1]> ip 10.10.1.2 /24
10.10.1.1
VPCS[1]> 2
VPCS[2]> ip 10.10.2.2 /24
10.10.2.1
VPCS[2]> 3
VPCS[3]> ip 10.10.3.2
255.255.255.0 10.10.3.1
VPCS[3]> 4
VPCS[4]> ip 10.10.4.2
255.255.255.0 10.10.4.1
VPCS[4]> save users
- Do not forget to use the command “save”, so the configuration will not be lost when the GNS restarted.
- View user’s IP address, by using the command "show".
- See the other commands by using the command "?" (questions mark)
It's
time to try. Still using VPCs. For example ping from computer C2 to C4.
VPCS[1]> 2
VPCS[2]> ping 10.10.4.2
It's
easy right ?


No comments:
Post a Comment